Original Link: https://www.anandtech.com/show/6327/thermaltake-armor-a30-case-review-opening-the-puzzle-box
Thermaltake Armor A30 Case Review: Opening the Puzzle Box
by Dustin Sklavos on September 24, 2012 12:01 AM EST- Posted in
- Cases/Cooling/PSUs
- Thermaltake
- MicroATX
Introducing the Thermaltake Armor A30
It's pretty clear on our side of the fence that smaller enclosures and leaner builds are increasingly becoming the way to go for most users these days, with even die hard enthusiasts drawn to these smaller cases if for no other reason than to see just how much horsepower they can cram into a small form factor system. There are tradeoffs made in going small form factor, though, and if you go too small the cooling demands can produce system noise that may be too much for many users.
That's why there are slightly larger, Micro-ATX scale enclosures like the Thermaltake Armor A30. Thermaltake's case is designed to support a Micro-ATX motherboard and a substantial video card or two, and the cooling system is remarkably robust. Yet as it turned out, working with the A30 proved to be a remarkably fraught experience, with the case having split personalities. Cooling and acoustic performance were actually quite good, but the case itself is tough to recommend. So what happened?
.jpg)
Thermaltake is pretty well known in the industry for being especially press friendly, and given the demand for smaller, more powerful systems, we figured we'd check in with them and see what they had to offer. The Armor A30 turned out to look like a pretty exceptional option, and despite having been around for a little over a year it looked to be a fairly current and competitive offering. This was a case I specifically headhunted, as it's actually roughly the same size in volume as BitFenix's exceptionally popular Prodigy while featuring support for Micro-ATX builds as well.
| Thermaltake Armor A30 Specifications | ||
| Motherboard Form Factor | Micro-ATX, Mini-ITX | |
| Drive Bays | External | 2x 5.25", 1x 3.5" |
| Internal | 2x 2.5", 2x 3.5" | |
| Cooling | Front | 90mm blue LED intake fan |
| Rear | 2x 60mm exhaust fan | |
| Top | 230mm blue LED exhaust fan | |
| Side | - | |
| Bottom | - | |
| Expansion Slots | 4 | |
| I/O Port | 1x USB 2.0, 1x USB 3.0, 1x eSATA, 1x Headphone, 1x Mic | |
| Power Supply Size | ATX | |
| Clearances | HSF | 90mm |
| PSU | 180mm | |
| GPU | 9.5" / 242mm | |
| Dimensions |
10.5" x 11.5" x 18" 266mm x 291mm x 456mm |
|
| Weight | 14.8 lbs / 6.7 kg | |
| Special Features | USB 3.0 passthrough | |
| Price | $119 | |
Because the A30 is about a year and a half old, I'm less inclined to ding Thermaltake for using a USB 3.0 passthrough instead of an internal header. What's surprising is the sheer weight of the enclosure. Thermaltake uses a decent amount of plastic, true, but an awful lot of steel. For an enclosure intended for LANs, the A30 is remarkably heavy and unfortunately does not include a handle. Its dimensions are appropriate to a more portable system, sure, but it starts at nearly fifteen pounds.
In and Around the Thermaltake Armor A30
I actually put off testing the A30 for a day because when I'd removed it from the box I was genuinely somewhat mystified by how it was supposed to come apart and back together. A Corsair case this is not, Thermaltake's A30 design is able to fit a decent amount of capacity and cooling into relatively svelte dimensions but somewhere along the line usability took a major backseat. This is not an intuitive case.
The basic aesthetic is undoubtedly going to be the subject of some debate, but I personally don't find it too outlandish. It definitely falls into the gamer-targeted market, but it's primarily an interesting use of angles and ventilated mesh. I actually quite like the way the front looks; the indented angle is stylized without being aggressively gaudy. It's also nice to see an external 3.5" bay, as I get a tremendous amount of mileage out of the card reader I use in my desktop.
.jpg)
When you get to the top, you'll see the beefy 230mm exhaust fan, and I suspect this monster is the reason why the A30's cooling performance is as strong as it is (you'll see later on). There's healthy ventilation in the top panel, too, as well as the sides in front of the windows. These are actually intriguing places to put vents, and if I had to hazard a guess I'd say they're in exactly the right place to work with the 230mm fan to produce healthy airflow through the case.
.jpg)
It's the rear of the case that's really the intimidating part, and taking one look at this was enough to make me procrastinate for one night. There are eleven thumbscrews in total back here, with no apparent rhyme or reason to their placement. As it turns out there actually is a reason why the back looks the way it does, and we'll get to that in a second. Another point of concern was the pair of 60mm exhaust fans, though, as small fans tend to produce quite a bit of noise.
Where everything goes haywire is the assembly of the case. Like one of SilverStone's more exotic designs, there's a very specific way the A30 comes apart. Unlike SilverStone's more exotic designs, it doesn't make much sense. The first part that needs to be removed is the entire top panel, fan and all, and that's done by removing three thumbscrews near the top rear of the case. Note that the motherboard tray is also removable, but for the first time in my entire life I'm actually going to call this out as a poor design choice.
.jpg)
With the top panel off, you get your first glimpse of the interior of the A30, but you'll also notice the external drive cage and power supply cage are both using the side panels as a brace. That leads to the A30's absolute biggest design flaw: the side panels aren't removable. Almost everything but the side panels is removable, but it makes taking the A30 apart needlessly involved. To wit: removing the external drive cage involves two thumbscrews, removing the power supply cage involves three thumbscrews and six regular screws, and removing the motherboard tray involves six thumbscrews (two shared with the power supply cage). The internal 3.5" drive cage beneath the external drive cage is held in place by a single thumbscrew but has to slide into place, and the front fascia of the case uses a series of plastic snaps. And just to seal the deal, there's also a bracket used to cover the mounts for the expansion slots that uses yet another thumbscrew.
_thumb.jpg)
_thumb.jpg)
_thumb.jpg)
_thumb.jpg)
_thumb.jpg)
_thumb.jpg)
For those of you who haven't been keeping score, all of that means getting the A30 ready for assembly involves removing a cumulative twenty screws and separating it into six parts, which is honestly insane. All of the fans use 4-pin molex connectors (and that's it), and while they're designed to be daisy-chained together they also can't take advantage of any of the motherboard's fan headers. Thermaltake's site advertises the chassis as being "fully modular," but really the problem is that there's just too much going on and it's going to play hell with assembly.
Assembling the Thermaltake Armor A30
Due to the Thermaltake Armor A30's "modular" design, you wind up essentially putting it together in pieces. That seems like a good plan right up until you get to cabling, at which point everything just flies out the window because the traditionally easiest way to cable a small form factor case like this one (slipping your hands in the sides) is impossible. For assembly and testing, note that we used our Mini-ITX testbed again as opposed to our Micro-ATX bed. The reason for this is that the Micro-ATX testbed's tower cooler is simply too tall; the power supply installs directly above the CPU in the A30, taking tower coolers out of the equation. I still pushed the case pretty hard with our GeForce GTX 560 Ti, though.
After removing the top panel, six thumbscrews are removed to slide the motherboard tray out of the back of the case. Even installing the I/O shield proved to be a minor nuisance, as there are studs behind the opening that force you to slide it in laterally and then snap it forward instead of being able to just pop it in. And while one would think a modular tray would make this part easier since you can wrap your hands around the sides, it actually makes it more difficult because there's very little bracing the back of the tray for when you apply pressure to the shield.
_thumb.jpg)
_thumb.jpg)
_thumb.jpg)
_thumb.jpg)
_thumb.jpg)
_thumb.jpg)
Installing the board itself was easy, but then wiring becomes an issue. The case headers are a decent length, but not really long enough to connect them all before you slide the tray back in. That means removing the power supply bracket and all seven screws there. Again, all of this would've been immeasurably easier if Thermaltake had simply designed the case's side panels to come off.
Removing the drive cages was fairly easy, but the front of the case's interior is just kind of a mess. The internal 3.5" drive cage risks pushing the header cables into the blades of the front 90mm intake fan, the gap between the 5.25" drive bays (even in the removable cage) makes lining them up more difficult than it needed to be, and the toolless mechanism used for mounting 2.5" drives to the top of the cage is not secure.
.jpg)
While the external 5.25" drive cage is mostly fine, mounting 2.5" drives to the top of the case involves inserting a plastic hinge into one side of the drive, then lining it up with two studs on the top of the cage and snapping it into place. The snap comes open pretty easily, and I wouldn't use a mechanical drive in either of the 2.5" slots. Irony: the one part of the A30's design that's genuinely toolless is the same one that invariably requires tools in most other cases.
.jpg)
The internal 3.5" drive cage feels pretty backwards, though. Half an allowance is made towards mounting 3.5" drives using side screws, but our Corsair Link unit has no bottom screw points, making it hang slightly in the cage. Some of this has to do with Corsair's awkward mounting design for the Link box, but was there any reason not to include all three side mounting holes in the cage?
Installing the power supply is actually pretty easy once you've got the cage out since it offers ample support for the underside. I was unsure of which way to orient the PSU initially; I don't like having the intake above the CPU the way it is. However, the top fan of the A30 is an exhaust, so flipping the PSU would sandwich two exhausts against each other. In the end the PSU was oriented with the intake on the bottom.
As for expansion cards, if your PCIe x16 slot is the topmost you should be fine going past the 9.5" spec I outlined in the table at the beginning of this review, but otherwise you're going to run into the cage for the 3.5" external bay.
.jpg)
Cabling the A30 without being able to get in from the sides was nightmarish, though. I'm fortunate that I have small hands and wrists, and slender fingers, because if I were the size of the average man I'd have been tremendously frustrated. There's a lot of fishing around the interior and a lot of shoving cables without actually really seeing where they're going. I worried tremendously that the power cables for the two 60mm exhaust fans would dip into the fan blades of the CPU heatsink, or that other cables would get stuck in the 230mm fan (this did happen at one point), or that the front leads would get caught in the fan blades of the 90mm front intake fan.
Assembling the A30 is needlessly complex and could've been drastically simplified in a few ways. First, make the motherboard tray part of the frame instead of removable. Second, use a steel frame to support the top-mounted cages instead of the side panels themselves and make the side panels removable. Third, keep the top panel removable. Fourth, reduce the number of screws holding the power supply cage in place to three: two on top, one on the back. Fifth, condense the drive cages into one major cage. Do so by stacking the two 5.25" drive bays on top of each other, and then include the pair of internal 3.5" drive bays in the bottom of the cage itself beneath those two drive bays. Sixth, use a more secure mounting mechanism for the 2.5" drives.
Testing Methodology
For testing Mini-ITX cases, we use the following standardized testbed in stock and overclocked configurations to get a feel for how well the case handles heat and noise. Again, note that while the A30 can technically fit a Micro-ATX motherboard, it's not tall enough to allow for our testbed's tower cooler. Because of the discrepancies that would make for in testing, we have chosen to use our mini-ITX testbed rather than going with a specialized (e.g. not something you can compare directly to our other cases) ATX build.
| Mini-ITX Test Configuration | |
| CPU |
Intel Core i3-2120 (65W TDP) |
| Motherboard | Zotac Z68ITX-A-E |
| Graphics Card |
Intel HD 2000 IGP Zotac GeForce GTS 450 Eco (dedicated) ASUS GeForce GTX 560 Ti DCII TOP (dedicated extra) |
| Memory | 2x2GB Crucial Ballistix Smart Tracer DDR3-1600 |
| Drives |
Kingston SSDNow V+ 100 64GB SSD Samsung 5.25" BD-ROM/DVDRW Drive |
| Accessories | Corsair Link |
| CPU Cooler | SilverStone NT07-1156 with Cooler Master ThermalFusion 400 |
| Power Supply | SilverStone Strider Plus 750W 80 Plus Silver |
Each case is tested with just the Core i3's integrated graphics as well as with a discrete graphics card. The system is powered on and left idle for fifteen minutes, the thermal and acoustic results recorded, and then stressed by running four threads in Prime95 (in-place large FFTs) on the CPU, and OC Scanner (maximum load) is run when the dedicated GPU is installed. At the end of fiteen minutes, thermal and acoustic results are recorded. If the enclosure has a fan controller, these tests are repeated for each setting. Ambient temperature is also measured after the fifteen idle minutes but before the stress test and used to calculate the final reported results.
We try to maintain an ambient testing temperature of between 22C and 24C. Non-thermal test results aren't going to be directly comparable to the finest decimal point, but should be roughly comparable and give a broader idea of how the enclosure performs.
Thank You!
Before moving on, we'd like to thank the following vendors for providing us with the hardware used in our testbed.
- Thank you to Puget Systems for providing us with the Intel Core i3-2120.
- Thank you to Zotac for providing us with the Z68ITX-A-E motherboard and GeForce GTS 450 Eco.
- Thank you to Crucial for providing us with the Ballistix Smart Tracer memory.
- Thank you to Corsair for providing us with the Corsair Link kit.
- Thank you to Kingston for providing us with the SSDNow V+ 100 SSD.
- Thank you to CyberPower for providing us with the Samsung BD-ROM/DVD+/-RW drive.
- And thank you to SilverStone for providing us with the power supply and NT07-1156 heatsink/fan combo.
Noise and Thermal Testing, IGP
Ordinarily I have a pretty clear idea of what I expect from an enclosure, but with the Thermaltake Armor A30 I honestly had no idea how I expected it to perform. The trio of small fans (two 60mm and one 90mm) without any kind of fan control led me to believe this case would actually be incredibly loud, but I wasn't sure if airflow was going to work out since the arrangement of fans felt strangely haphazard. As it turns out, for all of their foibles in assembly, Thermaltake definitely got the cooling right.
The A30 was tested with an ambient temperature of about 24C.
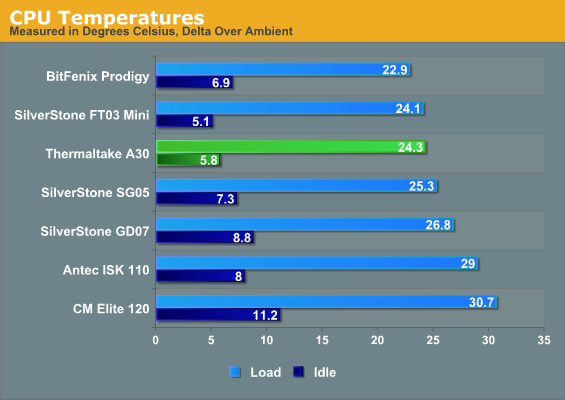

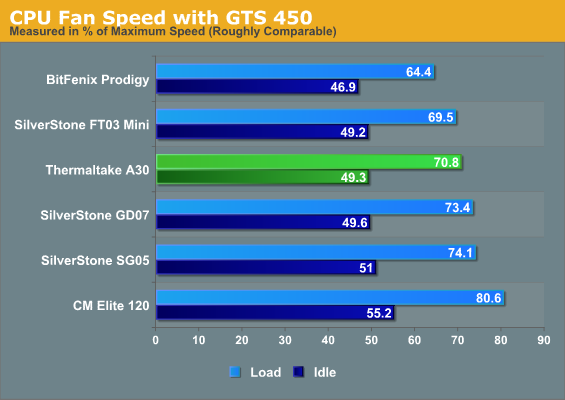
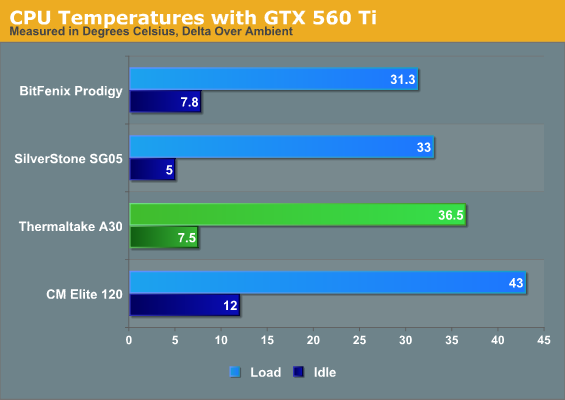
The A30's thermals are basically competitive with the best of the other cases at our relatively unstressful stock settings. The CPU temperatures are actually pretty impressive; I was expecting the heatsink's fan to be competing with the intake fan on the PSU for air, but that turned out not to be the case.
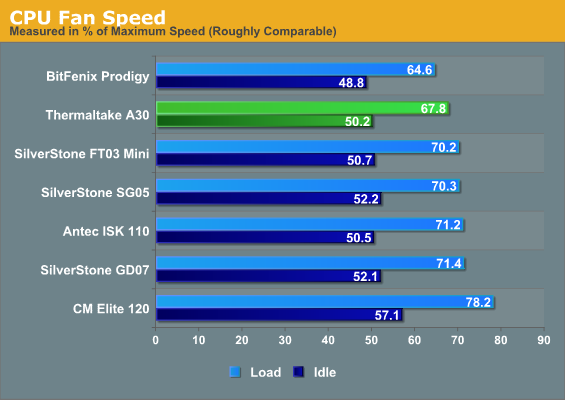
Fan speed on the CPU's heatsink was also very competitive, with only BitFenix's Prodigy besting it and not by a particularly significant amount.
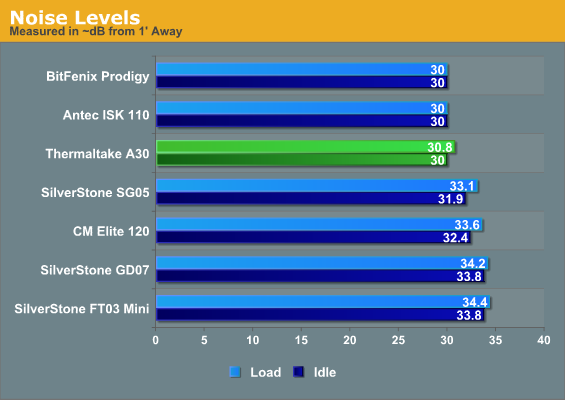
Honestly this is what impressed me about the A30. Despite having three tiny fans, the A30 is able to run with impressively low noise levels. The A30 is a hair over the noise floor of the sound meter under load, and certainly tolerable.
Noise and Thermal Testing, Dedicated GPUs
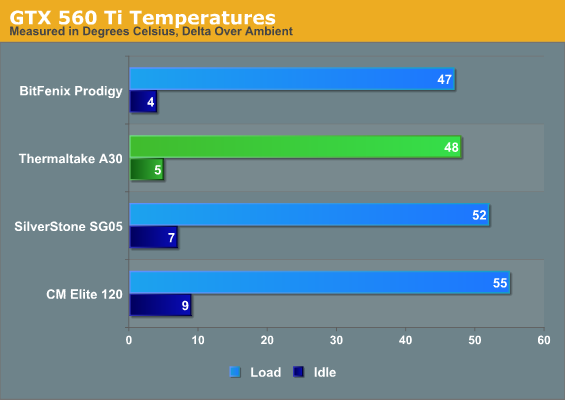
While the Zotac GeForce GTS 450 I typically add to smaller cases for testing tends to not cause too much of a racket or an increase in thermals, the GTX 560 Ti I've taken to using to test the more ambitious designs can create a very notable change. Given the pleasant surprise of the Thermaltake Armor A30's thermals and acoustics, I was curious to see if it would hold up under the increased stress. It did.

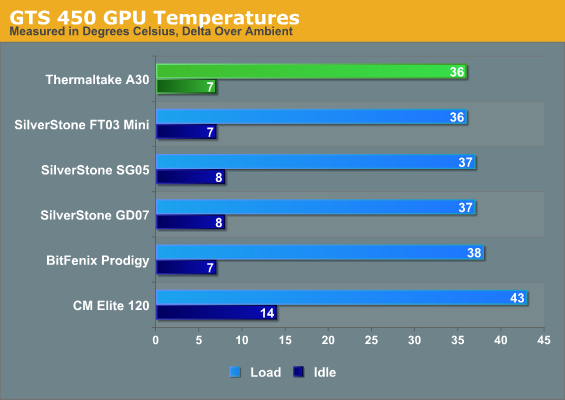
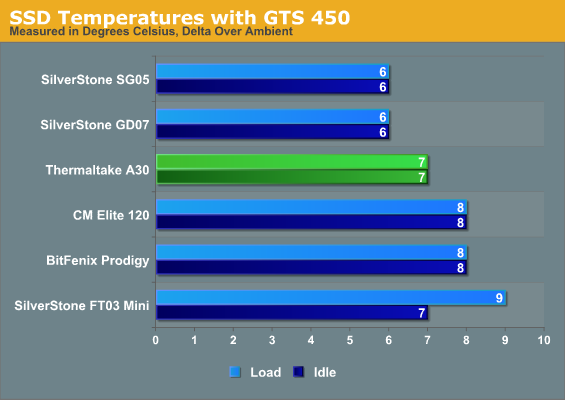
Once again, thermals in the A30 were competitive with the best of the smaller cases we've tested. It's clear the GTS 450 isn't adding a tremendous amount of stress to the situation.
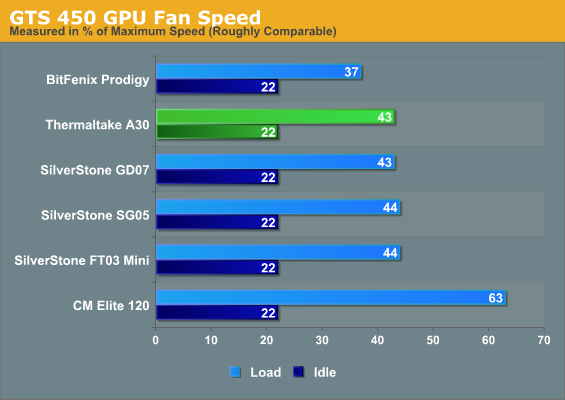
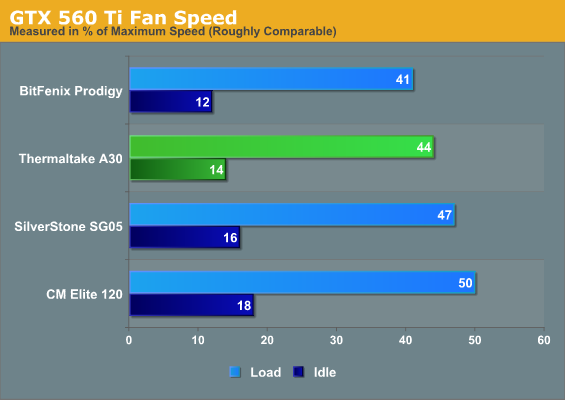
That sentiment is echoed when we look at the fan speeds; only the Prodigy and its...err...prodigious intake fan is able to best the rest of the pack.
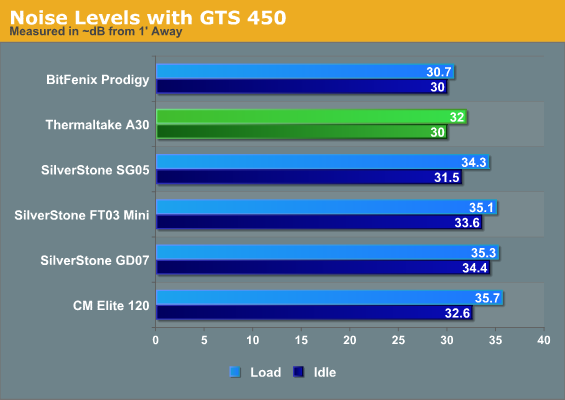
Under load the A30 is the second quietest behind the Prodigy; Thermaltake continues to impress. It's obvious an i3 and a single-slot, low-power GTS 450 aren't enough to really push this case, so let's see what happens when we install the much beefier GeForce GTX 560 Ti.
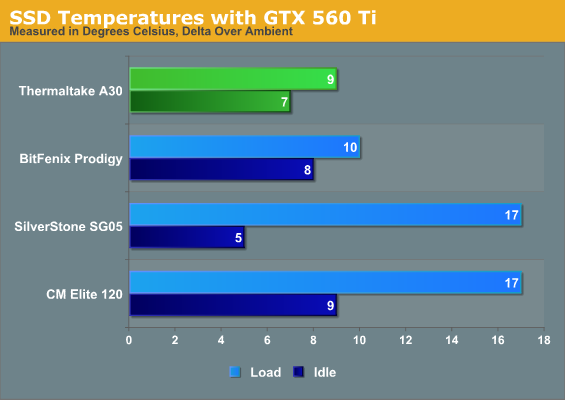
Things begin to separate but again, the A30's performance isn't bad at all. The SSD continues to experience very little heat due to its distance away from the heat-generating components; it doesn't get much airflow, if any, but doesn't need it as so little heat is really being trapped where it is.

The A30's cooling design continues to be a pretty big winner. While the GTX 560 Ti isn't getting too much active airflow from the case itself, it has access to enough open space between it and the wall of the case (plus the ventilation near the top) to perform reasonably well.
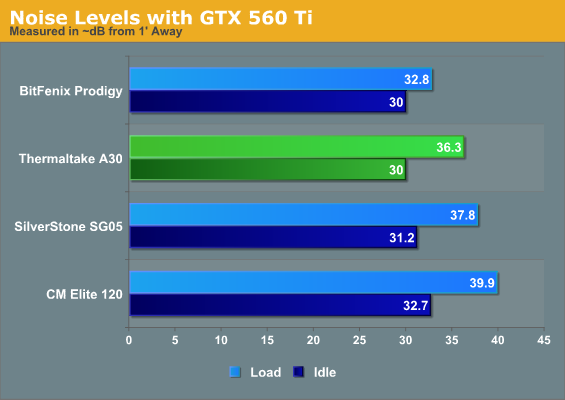
In my opinion, this is the A30's big victory. Acoustically it's still reasonably quiet, and though it can't compete with the Prodigy's size and thermal design, it's plenty competitive with the other cases we've tested. That said, it's important to keep in mind that it's also substantially bigger than the SilverStone SG05 (though I'd argue it doesn't make as efficient use of its space as SilverStone's design does).
Conclusion: Build It Once
Reviewing the Thermaltake Armor A30 puts me in an odd position, because as I mentioned in the intro, this is a case that's nightmarish to assemble but very good at its job once it's together. I'm left with very mixed feelings about what Thermaltake has done here, and I think any reader should be, too.
On the positive side, if you want a case that performs well despite its size, the only real competition to the Armor A30 that I've tested so far is the BitFenix Prodigy, and with that case you're definitely stuck using a Mini-ITX board instead of getting a little more oomph out of a Micro-ATX board. In terms of acoustics and thermal performance, Thermaltake's airflow design may seem haphazard in theory but is actually quite effective in practice. If performance is what you're prioritizing, this is a case worth shortlisting.
.jpg)
Unfortunately, on the flipside, while the cooling only seems haphazard the actual case design absolutely is. I haven't seen an assembly this badly planned in a while, and there's just no reason for it to be this difficult to put together. If you're a "set it and forget it" kind of builder then this may not mean much to you, but if you like to tinker with your system you're going to be in for a very rough ride with the A30. My power screwdriver hasn't been worked this hard on a review in some time now. I've already listed all the ways Thermaltake could've improved this part of the design, but I'm still baffled as to why it's such a disaster in the first place.
It's all going to come down to your needs and your priorities as a builder. Thermaltake posits the Armor A30 as a LAN enclosure (though my chicken wings and I personally think it's a hair too heavy for that), but it's certainly perfectly fine just as a smaller form factor case. These kinds of designs are getting more and more common, and thankfully the A30's fairly quiet nature makes it a perfectly suitable candidate for desktop placement (provided the blue LED fans don't bother you too much). At $119 I think it's a little on the pricey side for what you get, but if it fulfills your needs there's no reason not to pull the trigger.


